
Choosing and Using a Measuring Tool
Mackenzie Swenson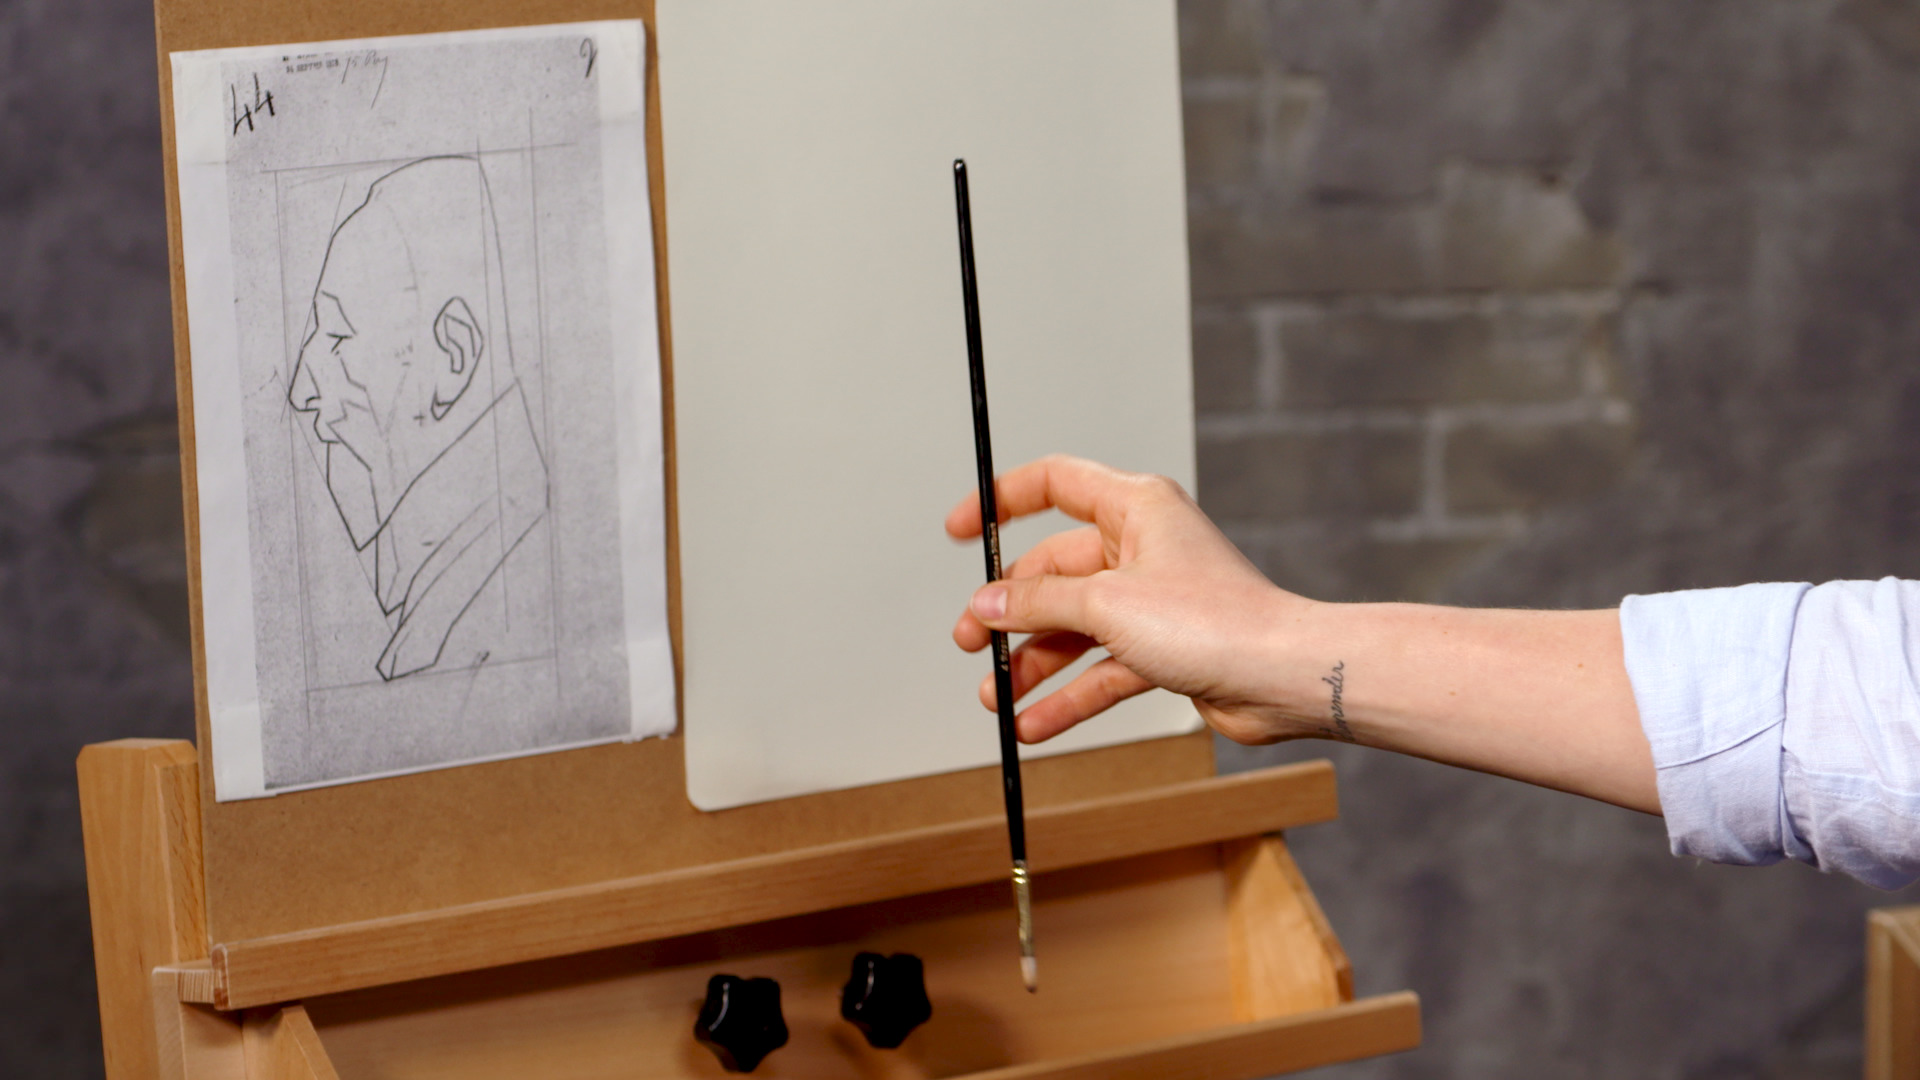
Video Player is loading.
Accurately capturing the original source material in the initial sketch is paramount for many artists. A simple measuring tool can help do that, says artist Mackenzie Swenson. You don’t need a ruler; the measuring done here is about translating what your eye sees onto paper, using a straight tool to keep everything in scale and balance. Mackenzie likes to use a long, thin paintbrush but advises that anything can be used—from a pointy knitting needle or cooking skewer to a bike spoke. As long as it is thin, straight, and at least 12 inches long, it will work. Bent or warped tools will cause measurements to be inaccurate.
Whether you’re measuring for angle (like the angle of a nose on a face), for dimension (how long something is in the reference photo), or for scale (transferring something life-size onto the paper in front of you), it is essential to record accurate measurements. Mackenzie holds her paintbrush between her fingers, with her middle finger underneath the tool and her ring and pointer fingers on top. She then extends her pinky to help stabilize the tool, which leaves her thumb available to move up and down the paintbrush’s shaft to take the actual measurement.
Once the tool is securely in her hand, Mackenzie works on her body posture to ensure accuracy. When taking measurements of a real-life scene, Mackenzie holds the tool perfectly plumb, tilting it neither towards nor away from the canvas or paper. Doing so would either shorten or lengthen the measurement she was intending to take. Mackenzie also makes sure to set firm her arms and body, moving only her shoulder left or right to take measurements. When she’s using the measuring tool directly on a reference photo, Mackenzie lays the tool flush to the paper, making sure her fingers are not between the paper and the tool. Doing so would compromise the accuracy of the measurement.
Hi, I'm Mackenzie Swenson. And today we're going to be talking about how to choose and use a measuring tool when starting your drawing. When you're going to use your measuring tool, what you're going to be doing with that is taking anything from your subject. So whether you're working from a photograph, an image, and some sort of flat reference material, or something from life, it's the tool that you use to take that information, tilts, different proportions, things like that, and translate that onto your paper. I'm going to be using this paintbrush today.
It's a thinner paintbrush. And so that's useful for, you know, for making sure that I'm able to be precise when I'm actually going up and taking those measurements. And it's a nice long handle. So I actually got this one, you know, specifically long handled and that makes it a useful tool for being able to use it for measuring. So, if you've got a paintbrush that kind of adheres to those qualifications, that can be totally fine.
Some other options that good include a long knitting needle. So sometimes you can get them where they're very thin. And then they also have a little bit of a point on the end, which is nice. And then also sometimes actually a cooking skewer can work well as a measuring tool. And then I've even seen people will use a bike spoke, or different things like that, but mainly something that is long enough and thin enough.
So you're able to get the distance without needing to extend it. And also the thinness allows you to be more precise. One thing to keep in mind is you also want to make sure that it's going to be straight. So, sometimes with like a cooking skewer when they're the wooden ones, they can kind of bow or bend. So just make sure that you've got something that isn't going to have a weird curve in it as you're using it.
So, how to actually hold and use that measuring tool. Whether you're going to be taking a tilt. And by that, I just mean, if I'm holding my pencil up, or my measuring tool up, and looking to kind of translate, let's just say this angle right here onto my paper, I want to make sure that I'm doing everything I can to keep that consistent. There are a few ways that I ensure an accurate measurement through keeping my drawing tool very steady, and making sure it's in a directly vertical orientation. So, I want to avoid having the drawing tool tip forward or tip backward, as any little shift like that is going to make the actual distance shorter.
So I wanna ensure that I'm keeping a consistent measurement from one side to the next. The way that I do that is by taking my middle finger and dropping it down, and actually holding the measuring tool. So, it's right sandwiched in between my fingers like that. And then I use my pinky for stability, and that leaves my thumb free to move up and down to get a precise measurement. So the other thing that I do to make sure that I get a consistent and stable measurement, is as I'm standing back, I make sure that my body is all set and very stable.
So the only thing that's moving is actually my shoulder. I keep my elbow not, you know, obnoxiously locked out, but that it's nice and straight, and I keep my shoulder relatively stationary. And so I'm just moving back and forth like this, because you can imagine if I have the tip of the brush on one point and my thumb on another point, and I wanna carry that over, but I move forward. Now, all of a sudden that distance is much smaller. And so the only way to make sure that this is an accurate way of carrying those measurements over is if I keep my whole body stable.
So that the only thing that's moving is my arm from the point of my shoulder. So if you are wanting to take a measurement of something that's actually on your paper, or an image that's next to your paper, make sure that you are moving your fingers out of the way, so that you can actually get flush with the surface. And if I needed to, for example, take a measurement on this drawing that went on the lower half, I would just need to flip my brush, so that I'm not running into the bottom of the easel. So keep that in mind that you want to, anytime you're taking a measurement on a flat image that's next to you or on your drawing, you wanna be sure that you're not kind of, that your fingers aren't behind the tool, and that your brush or whatever you're using for your measuring tool is flat to the page. And that should keep you accurate when you're working flat on something that's on your drawing board.
So, just to recap, when looking to choose a measuring tool, you wanna make sure that you're looking for something that's long, think at least 12 inches, something that is relatively thin. So actually thinner than a pencil width would be ideal, it can help if it has a little bit of a point on the end, and then just making sure that it isn't curved and that it's nice and straight. Happy drawing.
I would love to see her actually USE the measuring tool, not just describe it. I'd like to see her use it to measure from the drawing and from life.