Class
Basic Figure Drawing from a Reference Photo
$39.99
At a Glance:
- In-depth Instruction; over 235 mins
- On-demand video access anytime
- Bonus downloadable PDF resources
- Access to class Q&A
Item:
U9047E
Description
Have you ever sat down to draw the figure and felt unsure where to begin or how to move from a rough sketch to a confident, finished drawing?
In this comprehensive figure drawing course, Stuart Loughridge teaches you a clear, practical three-stage approach that removes the guesswork and replaces it with strategy. Designed for beginners through intermediate artists, this class focuses on building strong foundations first, so your finishes feel natural instead of forced.
You’ll start by learning how to set up your page, establish proportions, and block in the figure using simple envelopes and comparative measurements. From there, you’ll move into straight-line construction, where you’ll train your eye to see big relationships, points of depth, and internal rhythms before ever worrying about curves or details. This scaffolding stage is where real progress happens, and Stuart shows you how to patiently refine placement, symmetry, and structure so everything works together.
Once your drawing is solid, you’ll transition into a light, but refined, finish using clean line work and a simple two-value system to suggest form without over-modeling. Rather than chasing perfection or heavy rendering, the course emphasizes clarity, confidence, and freshness, helping you create drawings that feel alive and intentional.
Throughout the lessons, Stuart shares professional insights from decades of figure drawing experience, including how to work efficiently within limited pose times, how to avoid common proportional pitfalls, and how to think with your pencil as you build accuracy layer by layer.
If you’re ready to develop a reliable process, sharpen your observation skills, and gain confidence in drawing the human figure, this class will give you the tools to move forward with clarity and momentum.
Class Sessions

Introduction
3:15
Ready to build a clear, confident strategy for figure drawing, one that works across all your creative disciplines?
In this introduction to the figure drawing class, Stuart Loughridge lays out the philosophy and structure behind the entire course, guiding you through a thoughtful three-stage approach designed to take the overwhelm out of drawing the human figure. Rather than jumping straight into details, Stuart emphasizes developing a strong foundation first, including learning how to see, place, and organize the figure on the page with intention.
This class is built around practical concepts Stuart uses every day in his own studio practice, including points of depth, clean and purposeful line work, straight-line construction, and what he calls “evidence-based curves.” These ideas aren’t just for figure drawing, they translate beautifully into watercolor, oil painting, printmaking, outdoor sketching, and more. Figure drawing simply becomes the training ground where all these skills come together.
You’ll be working from two-dimensional reference material rather than a live model, making this an ideal entry point for anyone new to figure drawing, or anyone wanting to refine their fundamentals before stepping into longer live poses. Stuart shares insights from decades of experience, including intensive early training with long poses, and distills that knowledge into a clear, approachable system you can apply immediately.
He also explains his preference for fresh, energetic finishes rather than overly polished rendering, encouraging students to focus first on structure and line before moving into basic values. The goal is to build drawings that feel alive, confident, and spontaneous, while still being grounded in solid observation.
By the end of this introduction, you’ll understand exactly how the class is structured, what skills you’ll be developing, and how this method can strengthen your work across many mediums. It’s an inspiring starting point that sets the tone for a thoughtful, practical, and creatively empowering figure drawing journey.
Materials And Setup
6:02
In this lesson, Stuart walks you through his complete figure drawing setup, showing exactly how he prepares his space and selects materials to support accuracy, comfort, and confident mark-making. This video is all about removing guesswork before you ever put pencil to paper, so you can focus fully on learning to see and draw the figure.
Stuart starts with one of the most important foundations: your drawing board. You’ll learn why working on a large surface (like 16×20 or 18×24 inches) gives you room to think, measure, and make notes, and why positioning your board vertically on an easel, rather than flat on a table, helps prevent distorted proportions. He also explains how to arrange your reference material for comparative drawing, sharing tips on viewing distance and placement that support natural eye movement and better observation.
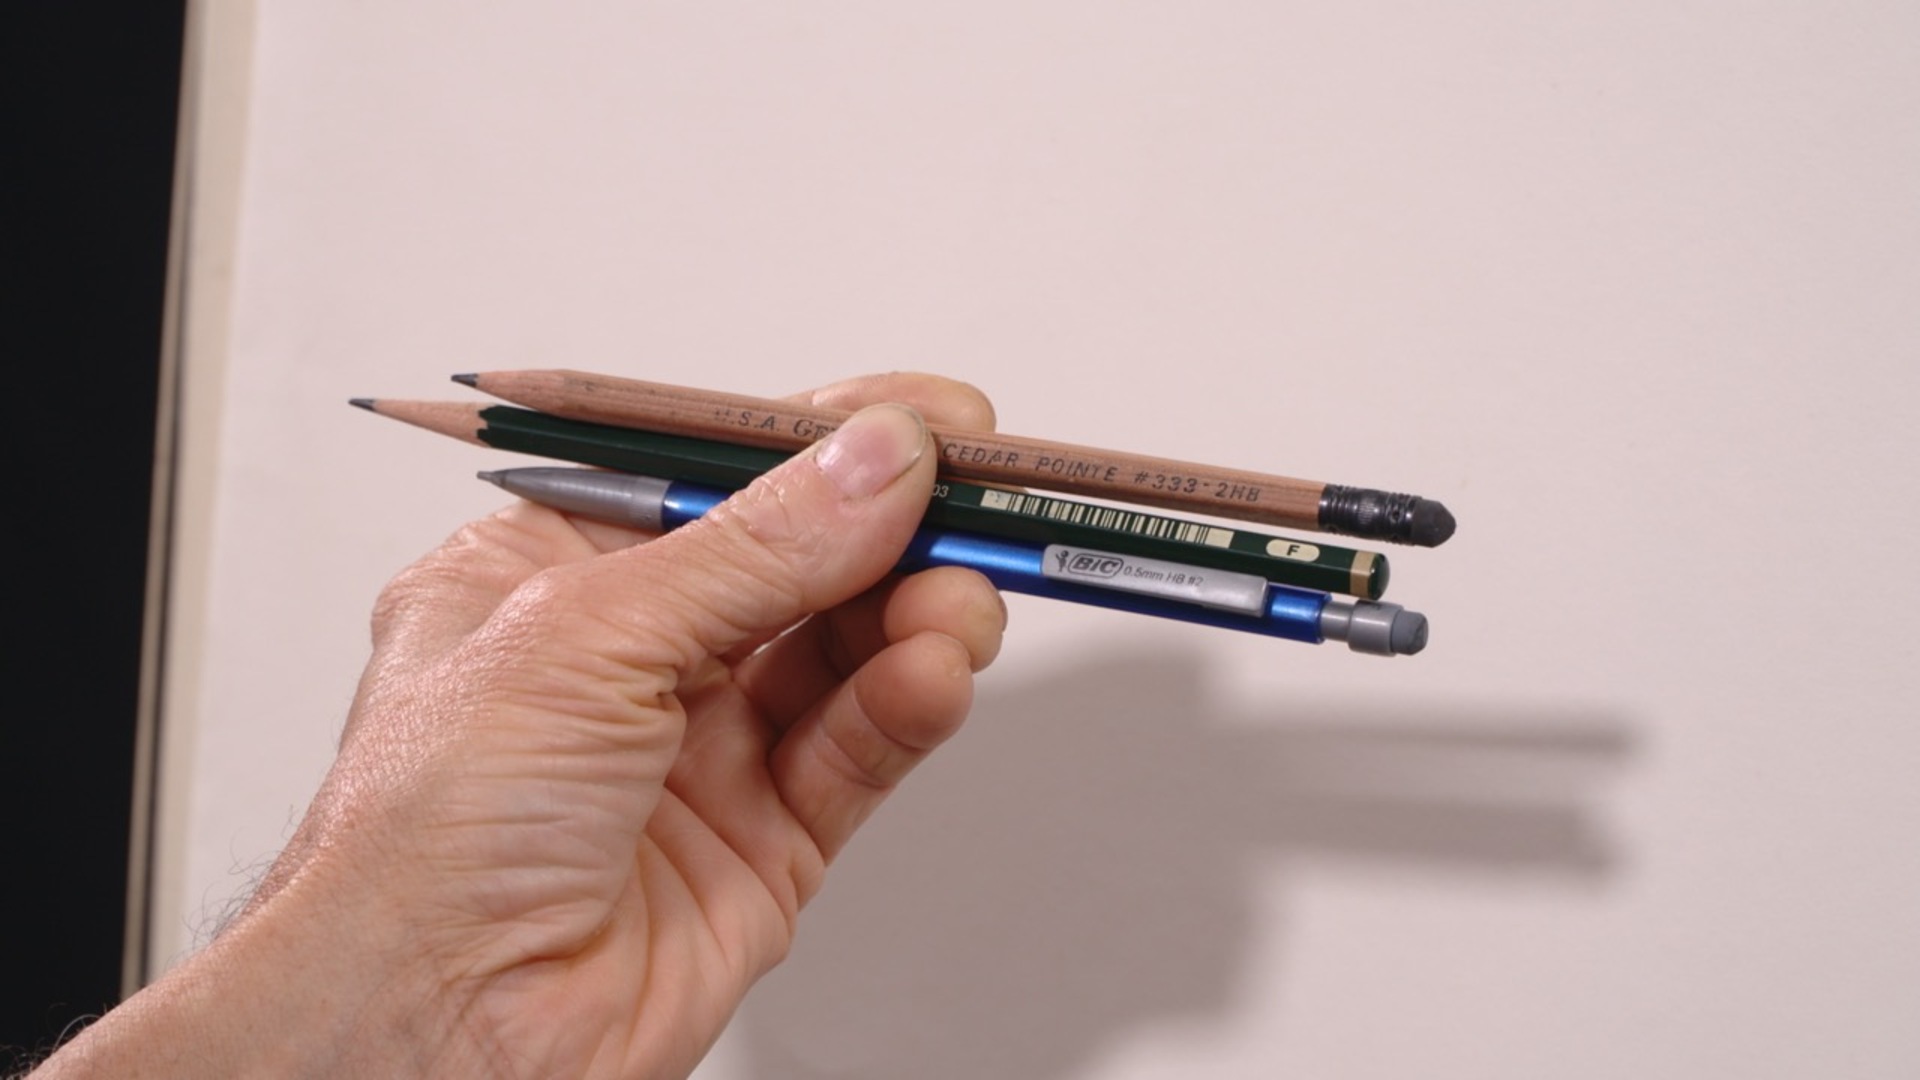
From there, Stuart breaks down his essential tools: graphite choices for clean early block-ins, the importance of drawing lightly to avoid scarring the paper, and why softer pencils like 2HB or F are ideal for the beginning stages. He introduces kneaded erasers as an active drawing tool, not just something for mistakes, along with sharpeners, rulers, and simple straight-edge alternatives for measuring proportions.
You’ll also learn why Stuart prefers comparative drawing over site-size, encouraging students to build strong visual judgment rather than relying on exact transfers. This approach develops flexibility, confidence, and long-term drawing skills, especially helpful when moving toward live figure sessions.
By the end of this lesson, you’ll have a clear understanding of how to organize your space, choose your materials wisely, and prepare mentally for the drawing process. It’s a grounded, thoughtful introduction that sets you up for success as you move into Stage One of the figure drawing journey.
Stage 1 Figure Drawing
1:00:23
Want a clear, confidence-building way to start figure drawing without getting overwhelmed by details right away?
In this beginner-friendly figure drawing lesson, Stuart Loughridge walks you through a modern, approachable process for building a figure in stages, starting loose, staying flexible, and gradually tightening toward accuracy. Instead of aiming for “perfect marks” from the first stroke, Stuart shows you how to treat the early drawing as scaffolding: light, adjustable, and designed to guide you toward correction rather than lock you into mistakes.
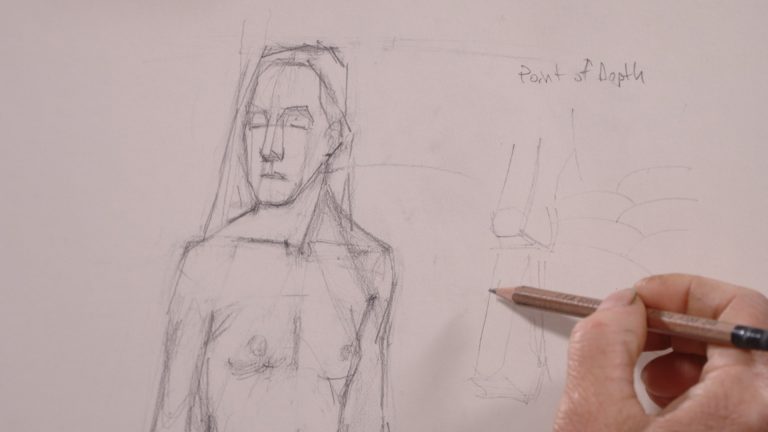
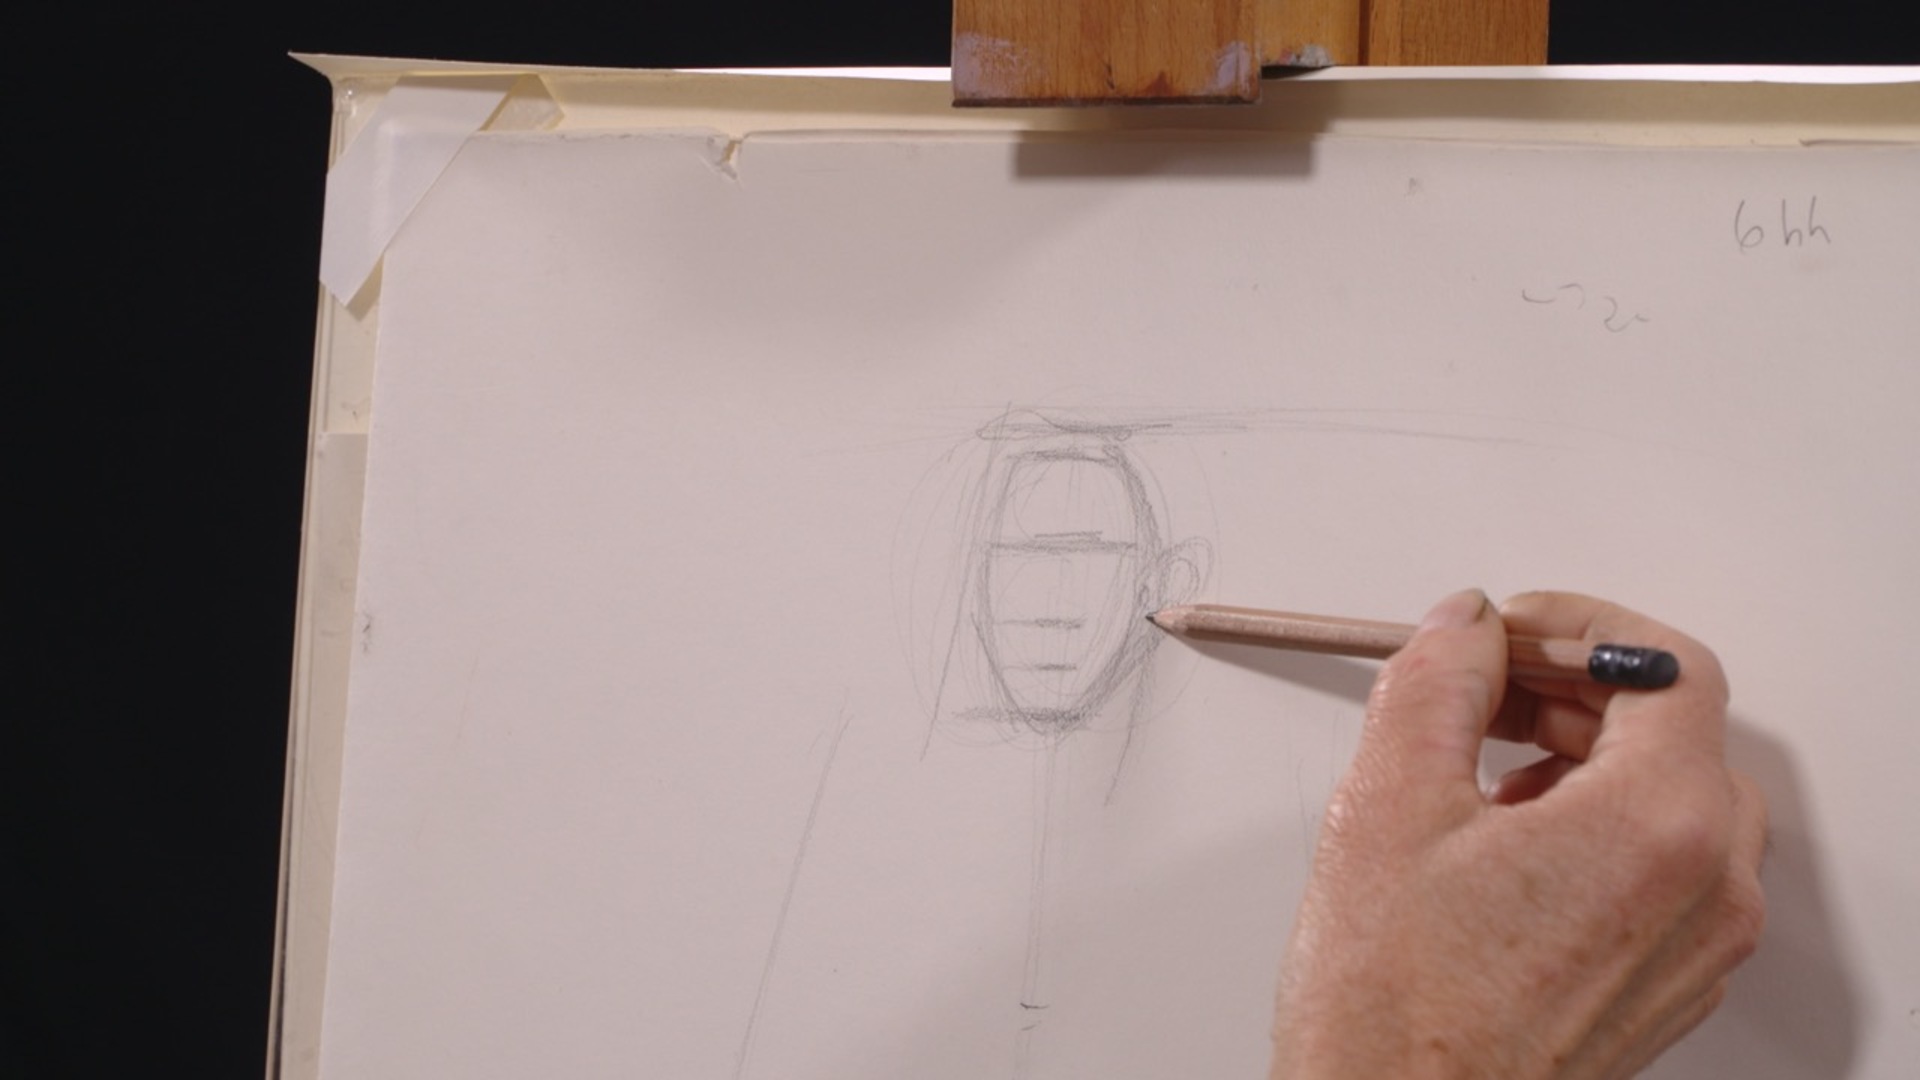
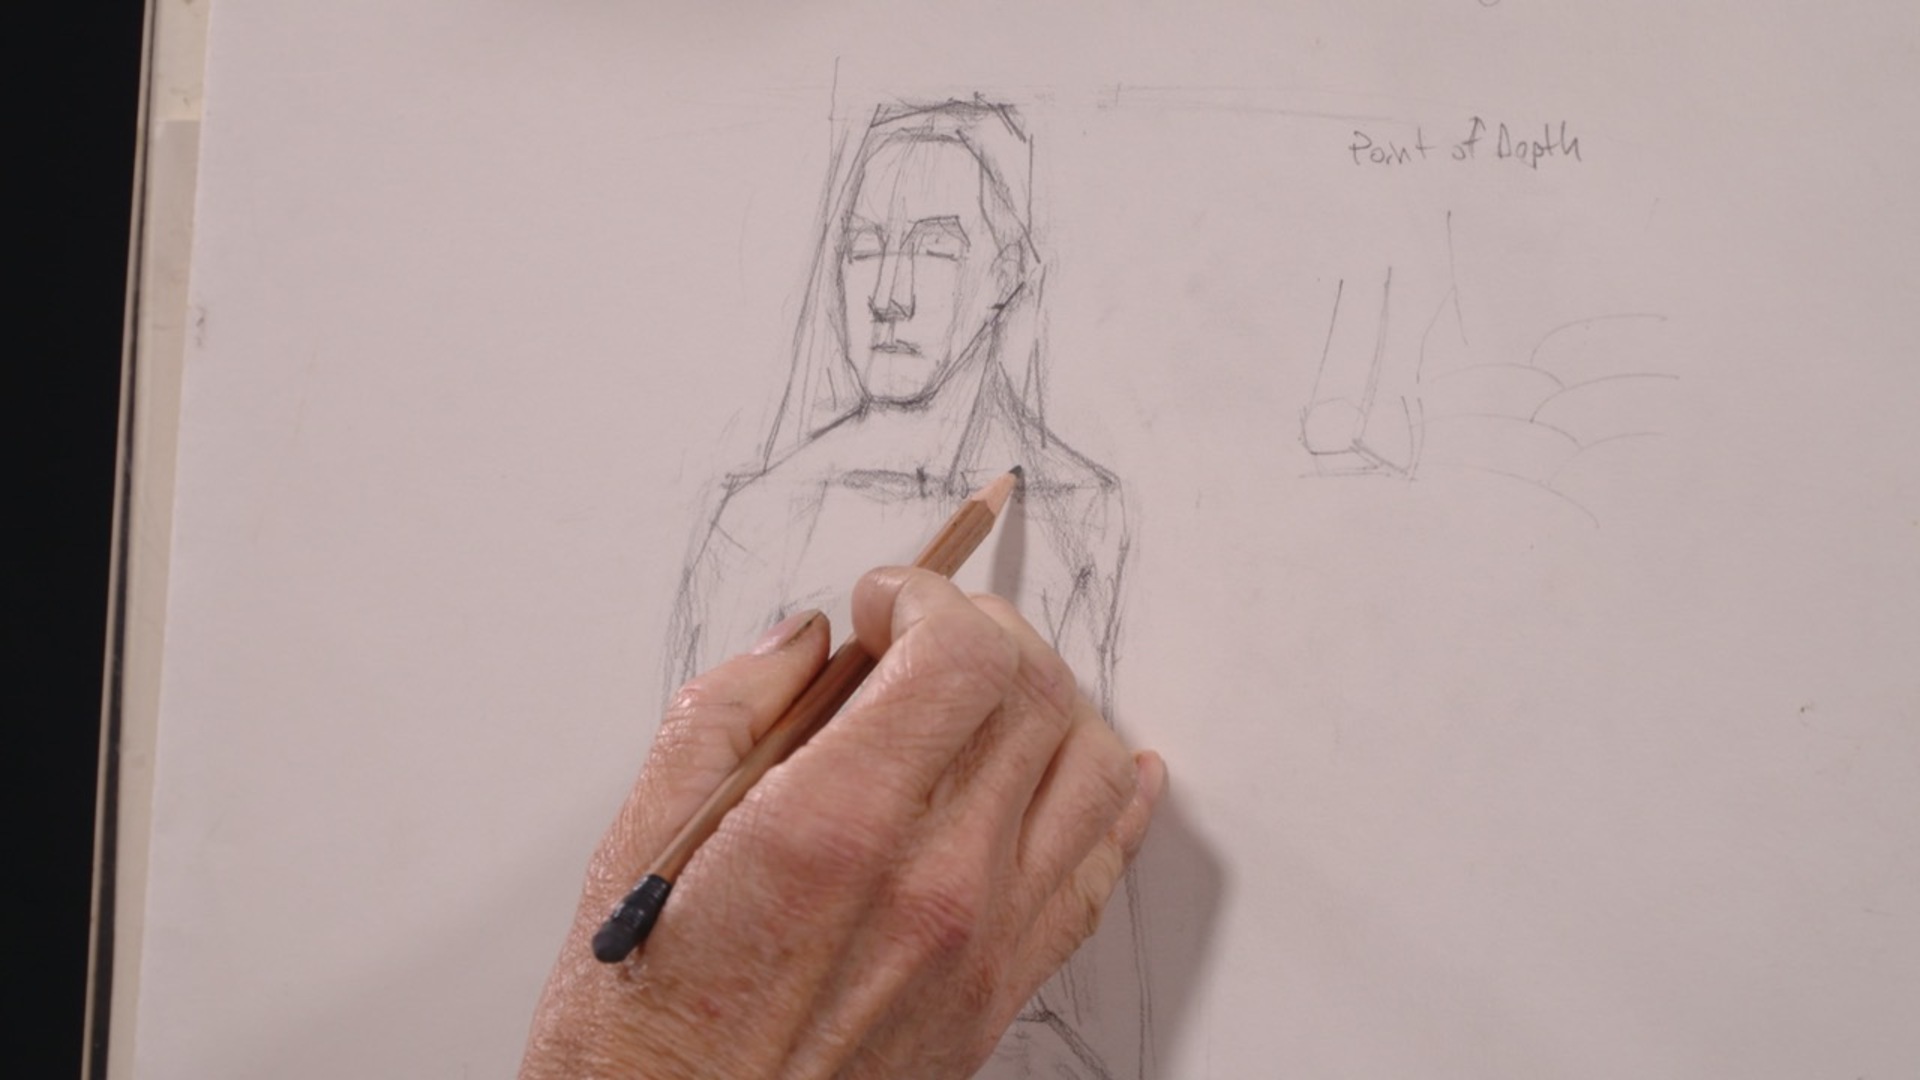
You’ll learn how to place the figure on the page with intention (including leaving breathing room for matting and framing), then establish an “envelope” of big angles that captures the figure’s overall gesture and proportion. Stuart demonstrates how holding the pencil farther back helps you draw with your arm creating long, energetic strokes that map the pose quickly and naturally.
From there, he introduces comparative measuring in a super practical way: locking your elbow, keeping your distance consistent, and using head heights to scale the figure so it fits your paper. This builds a reliable structure you can trust as you refine. Along the way, you’ll see how he calibrates everything, checking angles, aligning key landmarks, and using simple tools (like plumb lines and angle finding) to remove guesswork.
Stuart also shares why he avoids shading early, focuses on anatomical landmarks over changing shadows, and works symmetrically to catch errors sooner especially useful if you ever draw from a live model.
By the end of this session, you’ll have a strong foundation for figure drawing that feels doable, logical, and surprisingly freeing, setting you up for faster, cleaner “finish-stage” work later.
Refining Stage 1
22:17
Feeling stuck once you’ve roughed in a figure and wondering how to confidently push past that messy middle stage?
In this continuation of Stuart’s figure drawing process, you’ll dive deeper into Stage One refinement, where loose scaffolding transforms into a more intentional, structured drawing. This lesson is all about momentum: revisiting your work with fresh eyes, recalibrating proportions, and learning how to patiently “whittle” the figure into place through observation, comparison, and steady refinement.
Stuart walks you through how to re-enter a drawing thoughtfully, starting from a familiar anchor point (like the pit of the neck) and working outward to reassess relationships across the entire figure. You’ll see how small adjustments made by degrees (not dramatic changes) can dramatically improve accuracy. He emphasizes posture, full-arm movement, and keeping your body engaged while drawing, reminding you that figure drawing is as physical as it is visual.
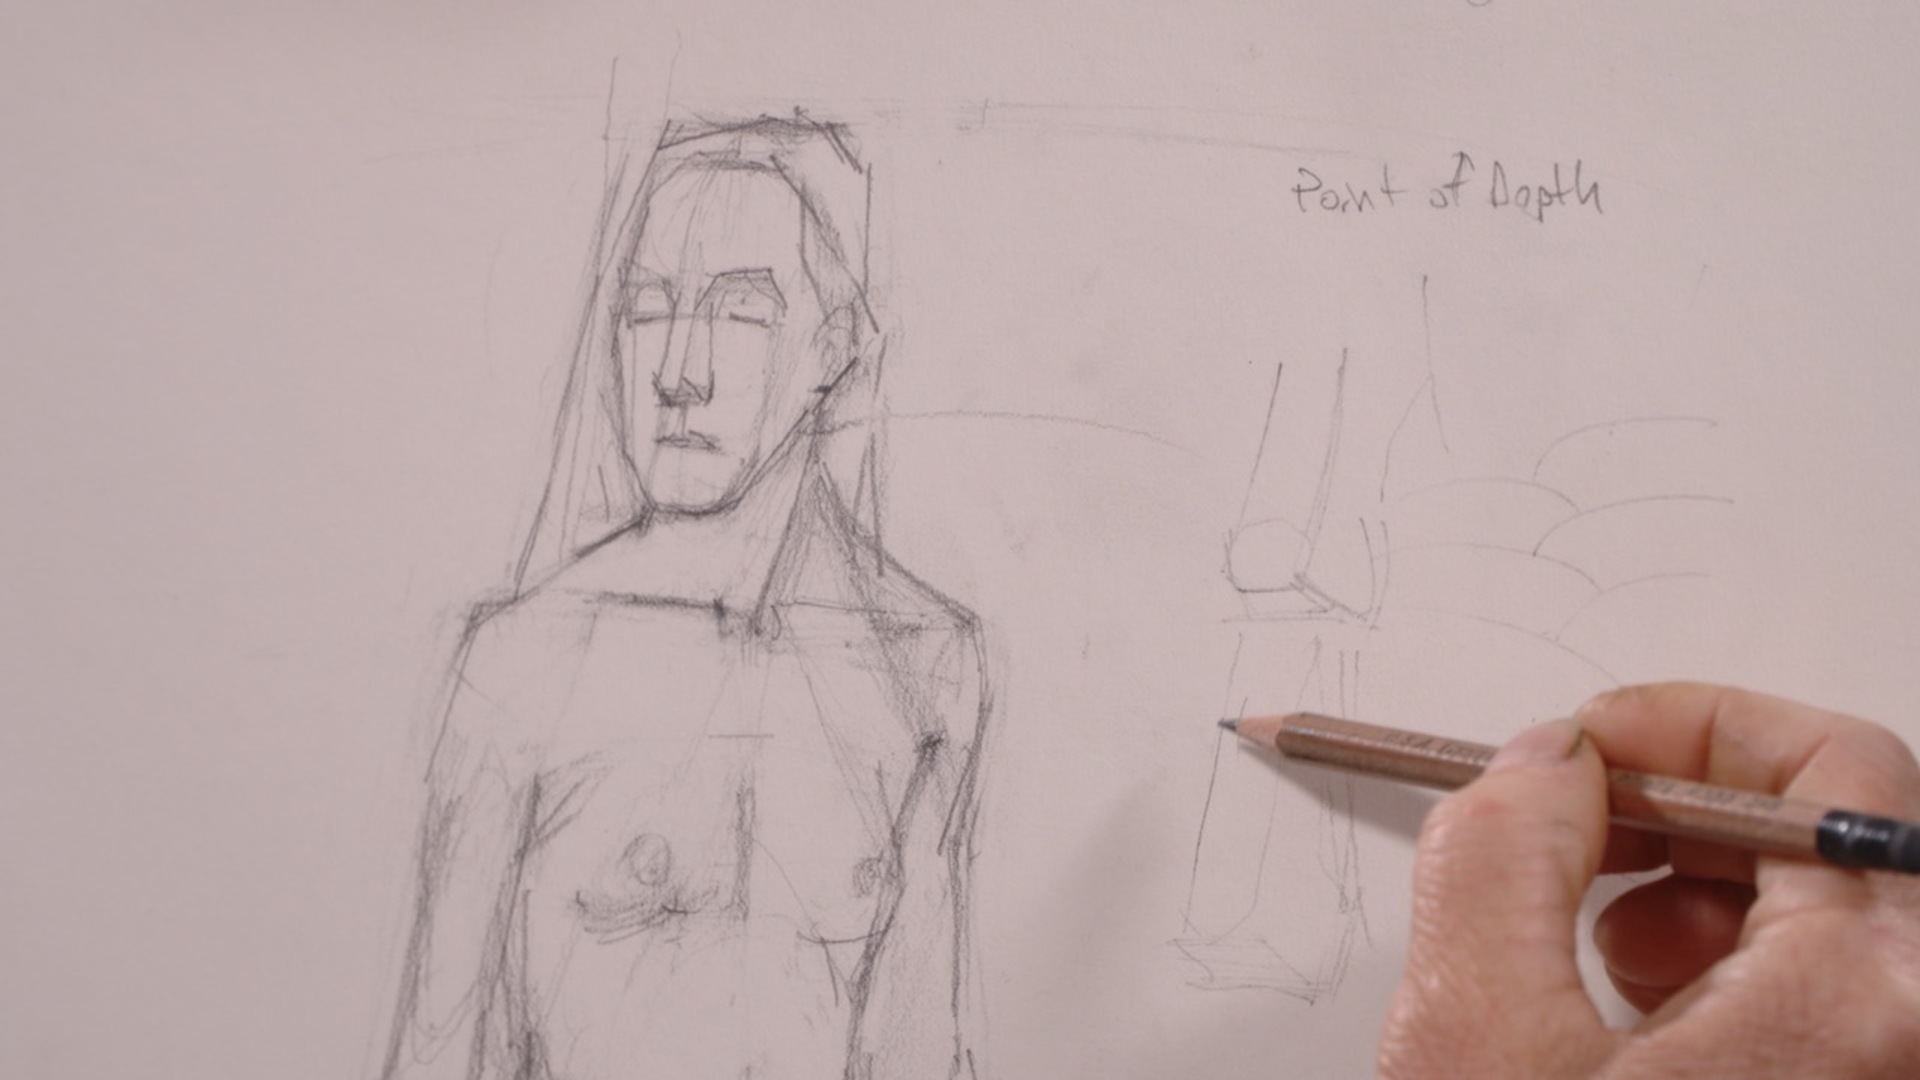
You’ll also learn how to use straight lines to simplify complex anatomy, how to avoid curves too early, and how to rely on comparative measurements to solve tricky areas like knees, hips, and shoulders. Stuart demonstrates how to take long-distance measurements across the body, double- and triple-check placements, and use angles to confirm alignment especially when proportions start to feel off. This is where patience pays off, and you’ll see how persistence slowly brings clarity.
What makes this lesson especially encouraging is Stuart’s honest look at the process: drawings get scratchy, lines overlap, proportions drift, and that’s all part of learning. He shows how to stay flexible, keep recalibrating, and trust that the figure will “find itself” as you continue measuring and refining.
By the end, you’ll understand how to complete your initial scaffolding with confidence and prepare for Stage Two. This video reinforces that strong drawings aren’t rushed, they’re built through careful observation, steady adjustments, and a willingness to stay curious while the figure comes together.
Stage 2 Figure Drawing
59:18
How do experienced draftsmen make a figure drawing look fresh and effortless without getting trapped in hours of heavy shading and overworking?
In this momentum-building lesson, Stuart returns from a break with a “fresh eye” and shows you exactly how to use that short window of sharper perception to your advantage. Instead of diving into one area and fussing endlessly, he demonstrates a smarter approach: sweep through the whole drawing, make quick note-corrections, and keep the figure moving forward as a unified system. You’ll see how he treats this phase not as “fixing mistakes,” but as continuing the patient process of whittling toward correctness.
This video focuses on the crucial bridge between Stage One scaffolding and the finish, an in-between refinement stage where clarity starts to emerge. Stuart tightens proportions, cleans up linework, and emphasizes what matters most: clear structure, strong relationships, and readable points of depth. You’ll watch him refine facial features with deliberate marks, using the “ghost” of earlier lines as a guide rather than erasing everything to perfection. That layered process keeps the drawing lively and gives you reliable information for the finish.
Along the way, he explains why he prioritizes line clarity over early shadow rendering, especially when working from a live model where shadows shift with breathing and movement. You’ll learn how to hold back at the right moments, rely on tools and measurement, and use anatomy overlaps to build an “evidence-based contour” instead of guessing at curves.
Stuart also walks you through cleaning up complex zones, like hands, feet, ankles, so that when it’s time to finish, you’re not fighting competing lines or confusion. The goal is simple: invest deeply in the front end so the finishing stage can be short, confident, and exciting.
By the end, you’ll feel how this strategy creates a drawing that stays loose, energetic, and believable, setting you up to return for the finish with a light touch and a clear plan.
Stage 3 Figure Drawing
1:06:06
Ready to take a figure drawing from “good scaffolding” to a clean, confident finish without smudging everything into mush or getting stuck in endless corrections?
In this wrap-up lesson, Stuart guides you into the finish, showing how all that patient front-end work pays off fast. He emphasizes a freeing mindset: this isn’t portrait commission work, so you’re not chasing perfect likeness, you’re chasing believability, structure, and clarity.
From there, the process gets exciting. Stuart sharpens his pencil, cleans up bulky passages, and demonstrates how to transition into finish without losing the underlying construction. He rolls the drawing back with a kneaded eraser to remove heavy lines while keeping the “ghost” structure intact leaving a light, accurate roadmap that makes the finish feel effortless. He also shares practical tool tips, like when to switch from a kneaded eraser to a clickable eraser for cleaner lifts.
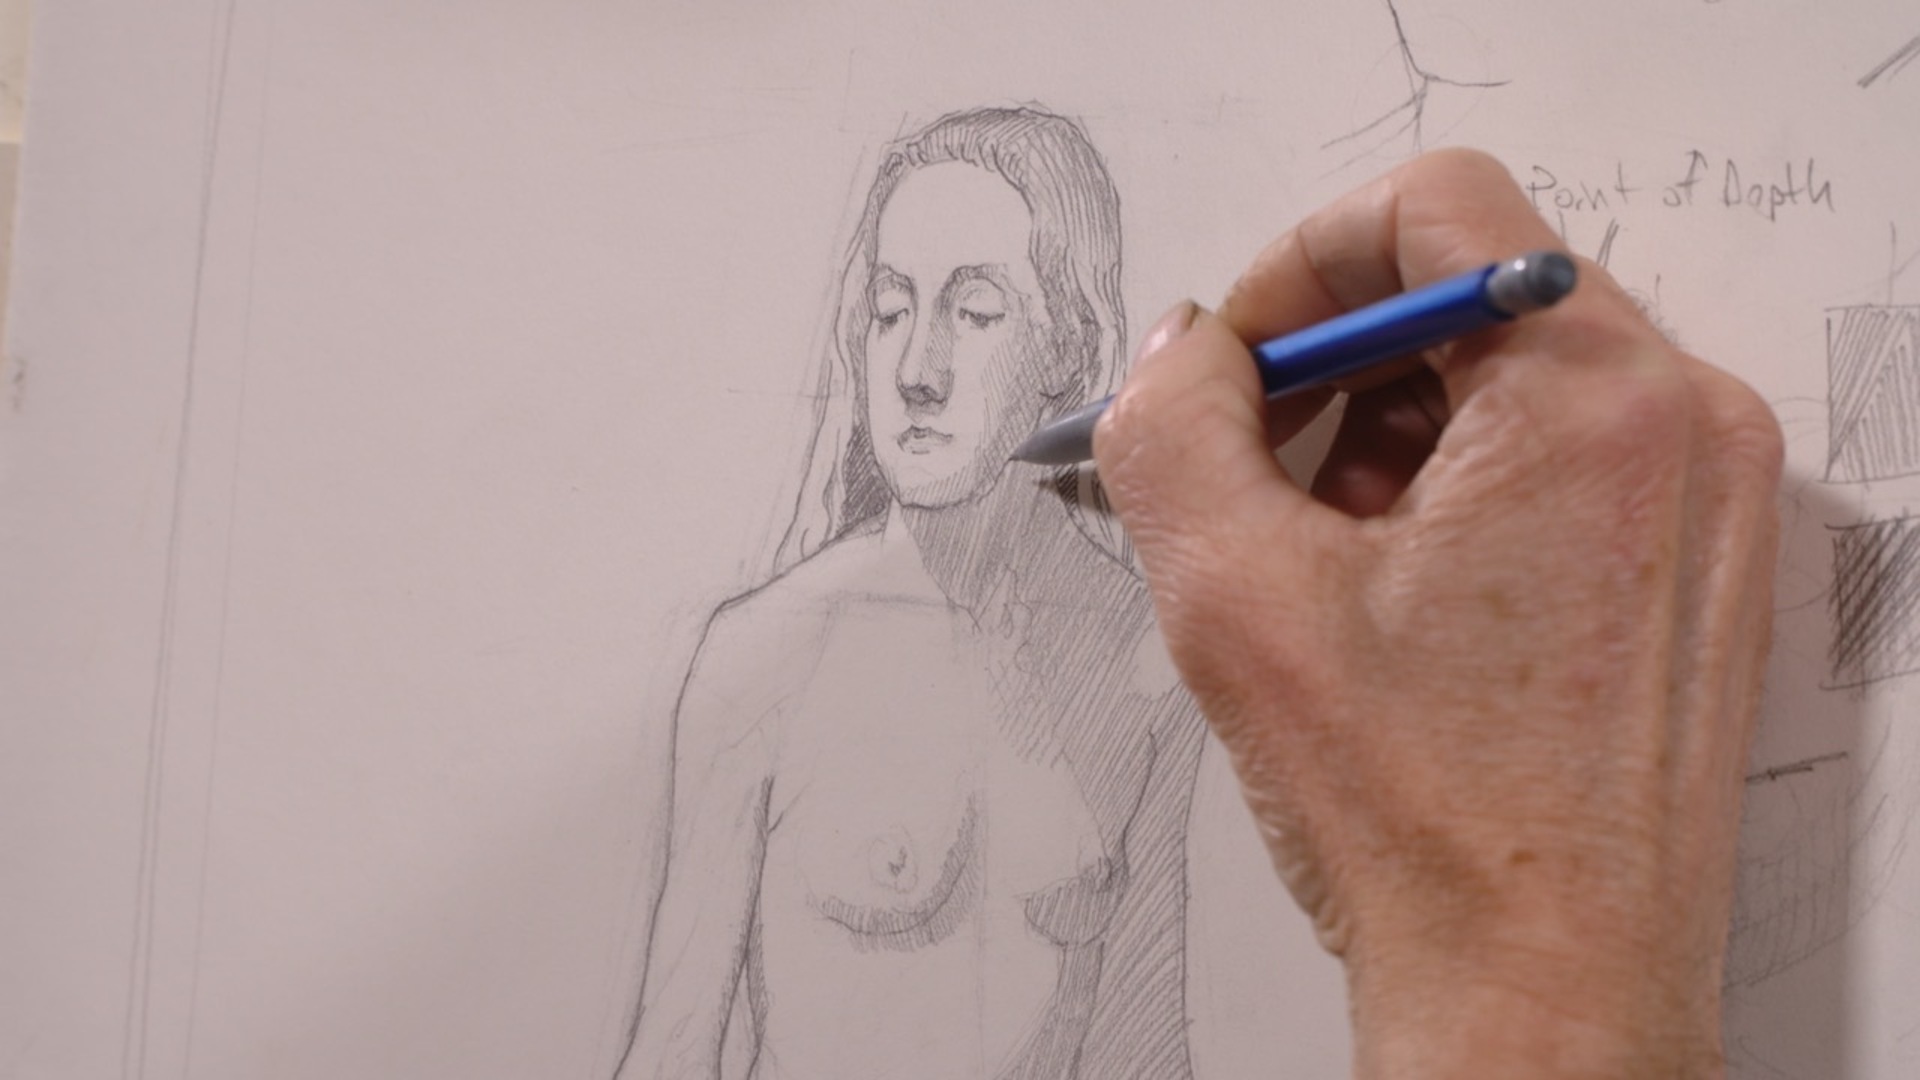
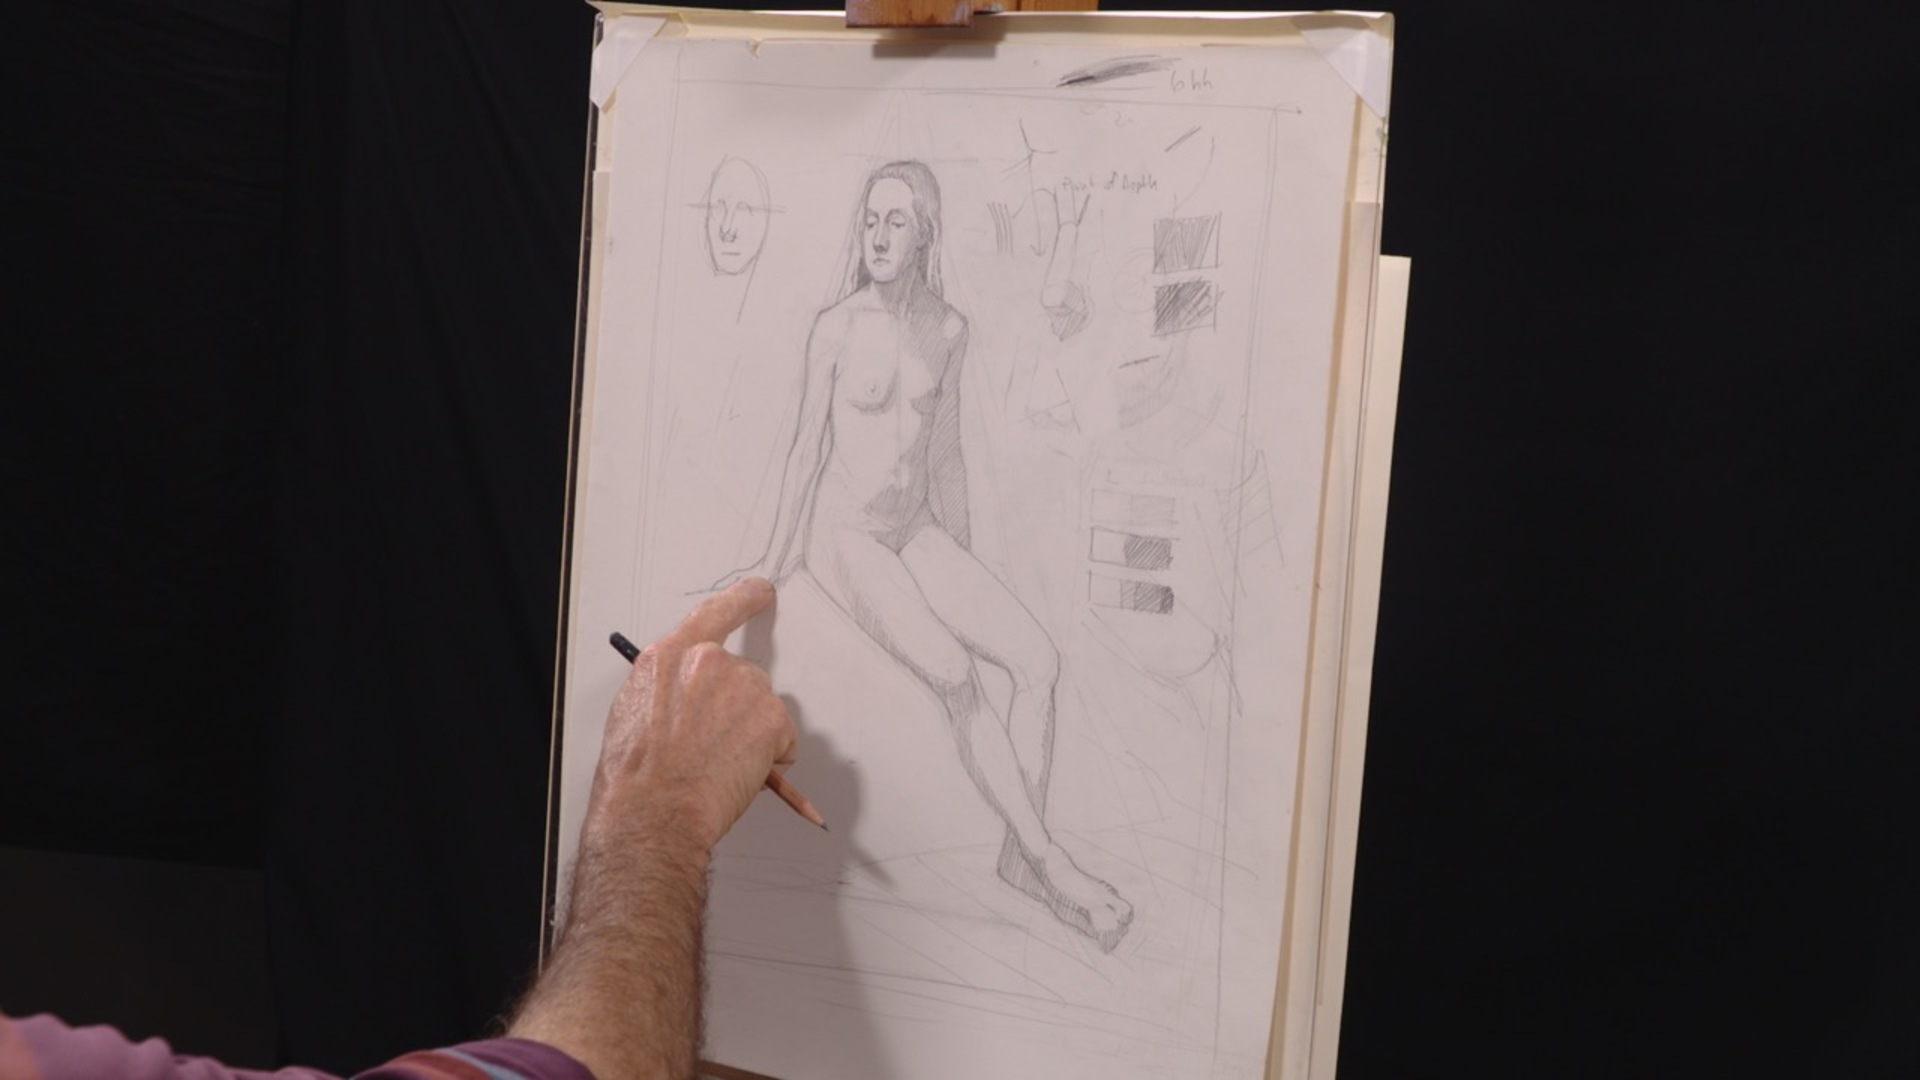
Next, he lays down crisp, intentional final line work, focusing on points of depth and overlaps that create convincing form, even before any shading happens. You’ll hear him repeatedly stress his signature preference: stay out of the lights. Rather than modeling highlights and complicating the value scale, he aims for a strong two-value relationship, light vs. shadow, so the drawing stays fresh and readable.
Once the contour drawing is clean, he lightly maps shadow shapes, then builds them with controlled hatching, favoring tidy, unified shadow masses over messy back-and-forth scribbling. He demonstrates how you can stop at a beautiful line drawing, or take it further with secondary hatch layers and a few dark accents, depending on time.
By the end, you see the big takeaway in action: when Stage One and Two are solid, the finish becomes the icing, not the struggle, and you walk away with a method you can transpose into painting, printmaking, or any medium that rewards clear structure and confident marks.
Recap
17:37
In this final recap video, Stuart zooms out and gives you a clear, motivating roadmap for the whole class what the three stages are, why they work, and how to practice so you actually improve (instead of getting stuck in endless erasing).
He starts by clarifying what this course isn’t: it’s not about “pushing into the round” with full sculptural modeling, chasing tiny highlights, or rendering every nuance. Instead, he intentionally keeps light passages clean and focuses on clearly stated shadows with a few softened edges. That restraint creates a strong foundation you can later build on, whether you want to move into more realistic form drawing, illustration, or painting.
Then he breaks down the three stages:
Stage 1 is all about placement and fit leaving room for borders/matting, establishing the top of the head, choosing a consistent head height measurement, and mapping how many “head-highs” the figure is so the drawing doesn’t run off the page. From there, you loosely find the envelope: the big, simple angles that capture the figure’s overall motion and proportions. His core mindset here: put marks down without fear, because drawing is largely about making decisions, then correcting them.
Stage 2 shifts into straight-line, block-form construction. Stuart stresses staying out of curves early, curves make you multitask and guess. Straight lines help you see relationships, measure cleanly, and spot points of depth, where one form clearly overlaps another. He also encourages working symmetrically across the body, especially as training for live-model work where the pose can subtly shift. This is the stage for double-checking and triple-checking angles, proportions, and placements so the finish isn’t a battle.
Stage 3 is the quick reward: you lighten the scaffolding, then commit to clean, decisive line work and simple value structure. The finish feels fast because the hard thinking has already happened.
His final encouragement is practical and freeing: practice starts. Do many Stage 1 and Stage 2 setups before obsessing over finish. A strong start lets you coast into the ending without frustration.
Your Instructor
Stuart Loughridge
Stuart is an artist based in St. Paul, Minnesota. As a studio painter, he works with oil paint and watercolors, primarily painting landscapes. In addition, he is a devoted printmaker and is well-known for his etchings.
Bonus Material
Class Supply List
Bonus Materials available for download after purchase.